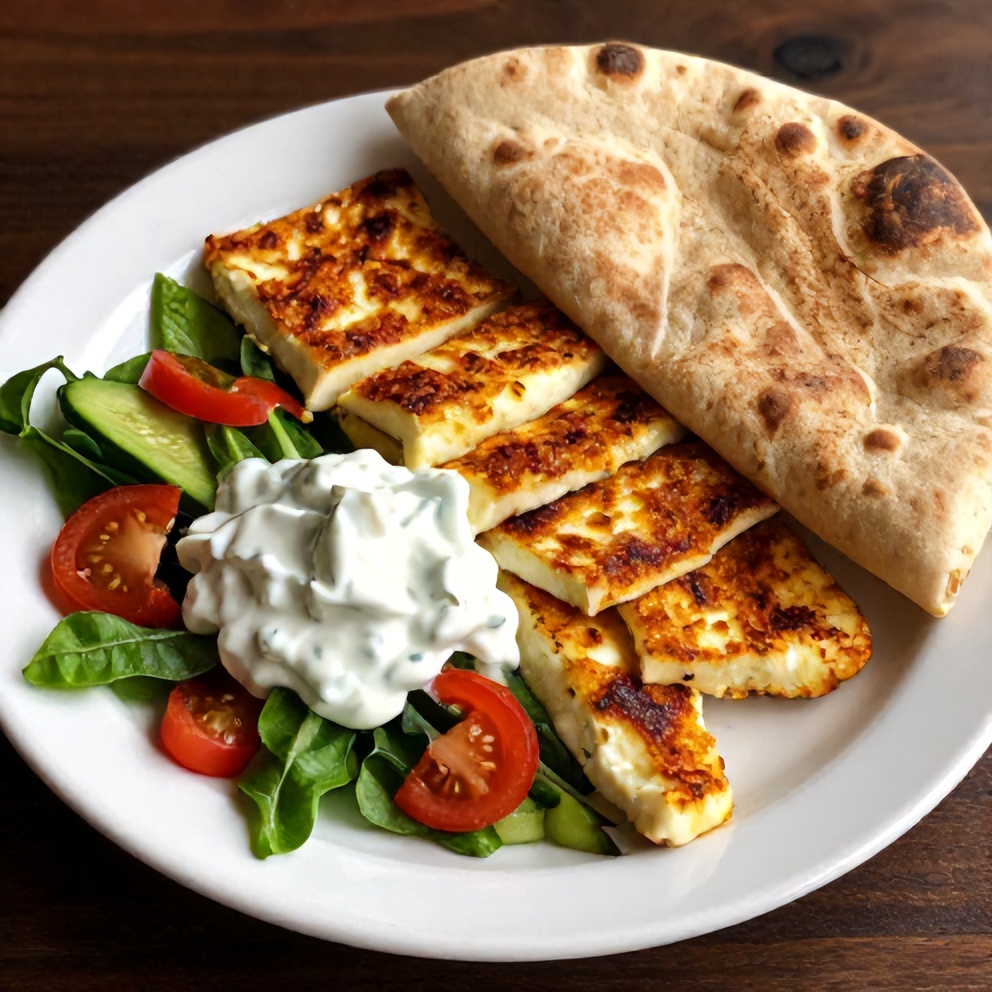
Quick Crispy Halloumi Greek Power Bowl Recipe

Crispy Halloumi Greek Power Bowl — The best quick and easy dinner idea! After making this many times, I discovered the trick to perfectly crispy halloumi that’s golden and irresistible. Jump to the recipe or keep reading for my best tips. If you love recipes like this, you’ll also enjoy Mexican Street Corn Style Grilled Zucchini Recipe and Easy Garlic Butter Steak Bites with Potatoes Recipe.
Why This Quick Crispy Halloumi Greek Power Bowl Recipe Is Pure Comfort
- Golden, crispy halloumi in just 15 minutes
- Fresh veggies and creamy tzatziki for a balanced meal
- Warm pita for dipping and soaking up every last bit of sauce
- Better than takeout and perfect for meal prep
What You'll Need for Quick Crispy Halloumi Greek Power Bowl Recipe
Choosing the right ingredients makes a big difference, but this recipe is forgiving enough to work with what you have.
- 200g halloumi cheese
- 1 cucumber
- 1 bell pepper
- 1 cup cherry tomatoes
- 1 small red onion
- 1 pita bread
- 1 tbsp olive oil
- 1 tsp dried oregano
- Salt and pepper, to taste
- 1/2 cup Greek yogurt
- 1 tbsp lemon juice
- 1 clove garlic, minced
- Optional: Fresh parsley, chopped
- Optional: Lemon wedges
- Optional: Olive oil, for drizzling

📝 Ingredient Notes
- Halloumi: Make sure to use halloumi, not feta or any other cheese. Halloumi has a unique texture and flavor that makes it perfect for this recipe.
🛒 Tools & Equipment I Recommend
- Cast iron skillet — Even heat distribution for perfectly crispy halloumi → See on Amazon
- High-quality olive oil — Enhances the flavor of the halloumi and veggies → See on Amazon
How to Make Quick Crispy Halloumi Greek Power Bowl Recipe
- Prepare the veggies: Dice the cucumber, bell pepper, cherry tomatoes, and red onion. Mix Greek yogurt, lemon juice, minced garlic, salt, and pepper for the tzatziki.
- Fry the halloumi: Cut the halloumi into thick slices. Heat olive oil in a pan over medium heat. Add the halloumi and cook until golden and crispy, about 2-3 minutes per side. Remove from pan and set aside.
- Assemble the power bowl: In a bowl, combine the diced veggies, crispy halloumi, and tzatziki. Tear the pita into pieces and warm it in the pan with the leftover halloumi oil. Serve the power bowl with warm pita and optional toppings.
Cook's Tips for Perfect Quick Crispy Halloumi Greek Power Bowl Recipe
- Common mistake and fix: Don't overcrowd the pan when frying the halloumi. Cook it in batches if necessary to ensure even browning and crispiness.
- Expert tip: For extra crispy halloumi, pat it dry with a paper towel before frying. This helps to remove any excess moisture and promotes better browning.
- Time-saving tip: Prepare the veggies and tzatziki while the halloumi is cooking to save time.
- Nutrition tip: For a lower-calorie version, use less halloumi and add more veggies to the power bowl.
Storing & Reheating Quick Crispy Halloumi Greek Power Bowl Recipe
Short-Term Storage
Store in an airtight container in the fridge. Store leftovers in an airtight container in the fridge for up to 3 days. Make-ahead tip: You can prepare the veggies and tzatziki up to 1 day ahead. Store separately in the fridge.
Freezing Quick Crispy Halloumi Greek Power Bowl Recipe
Not recommended for this recipe.
How to Reheat Without Drying It Out
Oven: Reheat in the oven at 350°F (180°C) for 10-15 minutes. Microwave: Reheat in the microwave for 1-2 minutes, then crisp up in the oven or toaster oven.
Recipe Notes
- Chef tip: For a spicy version, add some chopped jalapeño or red pepper flakes to the tzatziki.
- Best substitution: If you can't find halloumi, you can use paneer or firm tofu as a substitute.
- Make-ahead: This recipe is perfect for meal prep. Assemble the power bowls without the pita and store in the fridge. Warm the pita and crisp up the halloumi before serving.
- Scaling: This recipe serves 2. To serve more, simply double or triple the ingredients.
- Troubleshooting: If your halloumi isn't crispy, try increasing the heat or cooking it for a longer period of time. Be careful not to burn it, though.
Want to level up this recipe?
High-quality cutting board — Ensures safe and efficient prep work for all your veggies → Check price on Amazon
Quick Crispy Halloumi Greek Power Bowl Recipe
Ingredients
Main Ingredients
- 200g halloumi cheese
- 1 cucumber
- 1 bell pepper
- 1 cup cherry tomatoes
- 1 small red onion
- 1 pita bread
Seasonings
- 1 tbsp olive oil
- 1 tsp dried oregano
- Salt and pepper, to taste
- 1/2 cup Greek yogurt
- 1 tbsp lemon juice
- 1 clove garlic, minced
Optional Toppings
- Fresh parsley, chopped
- Lemon wedges
- Olive oil, for drizzling
Instructions
- Prepare the veggies: Dice the cucumber, bell pepper, cherry tomatoes, and red onion. Mix Greek yogurt, lemon juice, minced garlic, salt, and pepper for the tzatziki.
- Fry the halloumi: Cut the halloumi into thick slices. Heat olive oil in a pan over medium heat. Add the halloumi and cook until golden and crispy, about 2-3 minutes per side. Remove from pan and set aside.
- Assemble the power bowl: In a bowl, combine the diced veggies, crispy halloumi, and tzatziki. Tear the pita into pieces and warm it in the pan with the leftover halloumi oil. Serve the power bowl with warm pita and optional toppings.
Notes
- Chef tip: For a spicy version, add some chopped jalapeño or red pepper flakes to the tzatziki.
- Best substitution: If you can't find halloumi, you can use paneer or firm tofu as a substitute.
- Make-ahead: This recipe is perfect for meal prep. Assemble the power bowls without the pita and store in the fridge. Warm the pita and crisp up the halloumi before serving.
- Scaling: This recipe serves 2. To serve more, simply double or triple the ingredients.
- Troubleshooting: If your halloumi isn't crispy, try increasing the heat or cooking it for a longer period of time. Be careful not to burn it, though.
Storage
- Fridge: Store leftovers in an airtight container in the fridge for up to 3 days.
- Freezer: Not recommended for this recipe.
- Oven reheat: Reheat in the oven at 350°F (180°C) for 10-15 minutes.
- Microwave reheat: Reheat in the microwave for 1-2 minutes, then crisp up in the oven or toaster oven.
- Make ahead: You can prepare the veggies and tzatziki up to 1 day ahead. Store separately in the fridge.
Nutrition Per Serving
- Calories: 450
- Protein: 30g
- Fat: 28g
- Carbs: 28g
- Fiber: 4g
- Sugar: 7g
- Sodium: 1200mg
- Cholesterol: 90mg
- Sat. Fat: 16g
Nutritional values are estimates only. Actual values may vary by brand and portion size.
Quick Crispy Halloumi Greek Power Bowl Recipe FAQs
Yes, you can prepare the veggies and tzatziki up to 1 day ahead. Store separately in the fridge. Assemble the power bowls without the pita and warm it up before serving.
Make sure your pan is hot enough and that you're not overcrowding it. Try increasing the heat or cooking the halloumi for a longer period of time. Be careful not to burn it, though.
No, feta won't give you the same texture and flavor as halloumi. Try using paneer or firm tofu as a substitute if you can't find halloumi.
Yes, this recipe is naturally gluten-free. Just make sure to use gluten-free pita if you have celiac disease or gluten intolerance.
Yes, feel free to add your favorite veggies to this power bowl. Some great options include sliced avocado, roasted sweet potatoes, or grilled zucchini.
A Warm Final Note
I can’t wait for you to try Quick Crispy Halloumi Greek Power Bowl Recipe and see how effortlessly it comes together. When you make it, pop back here and leave a rating or share how it turned out — I love hearing from you!